Thursday, 15 October 2015

Exterior Urban Drawing

Process and Production - Illustration

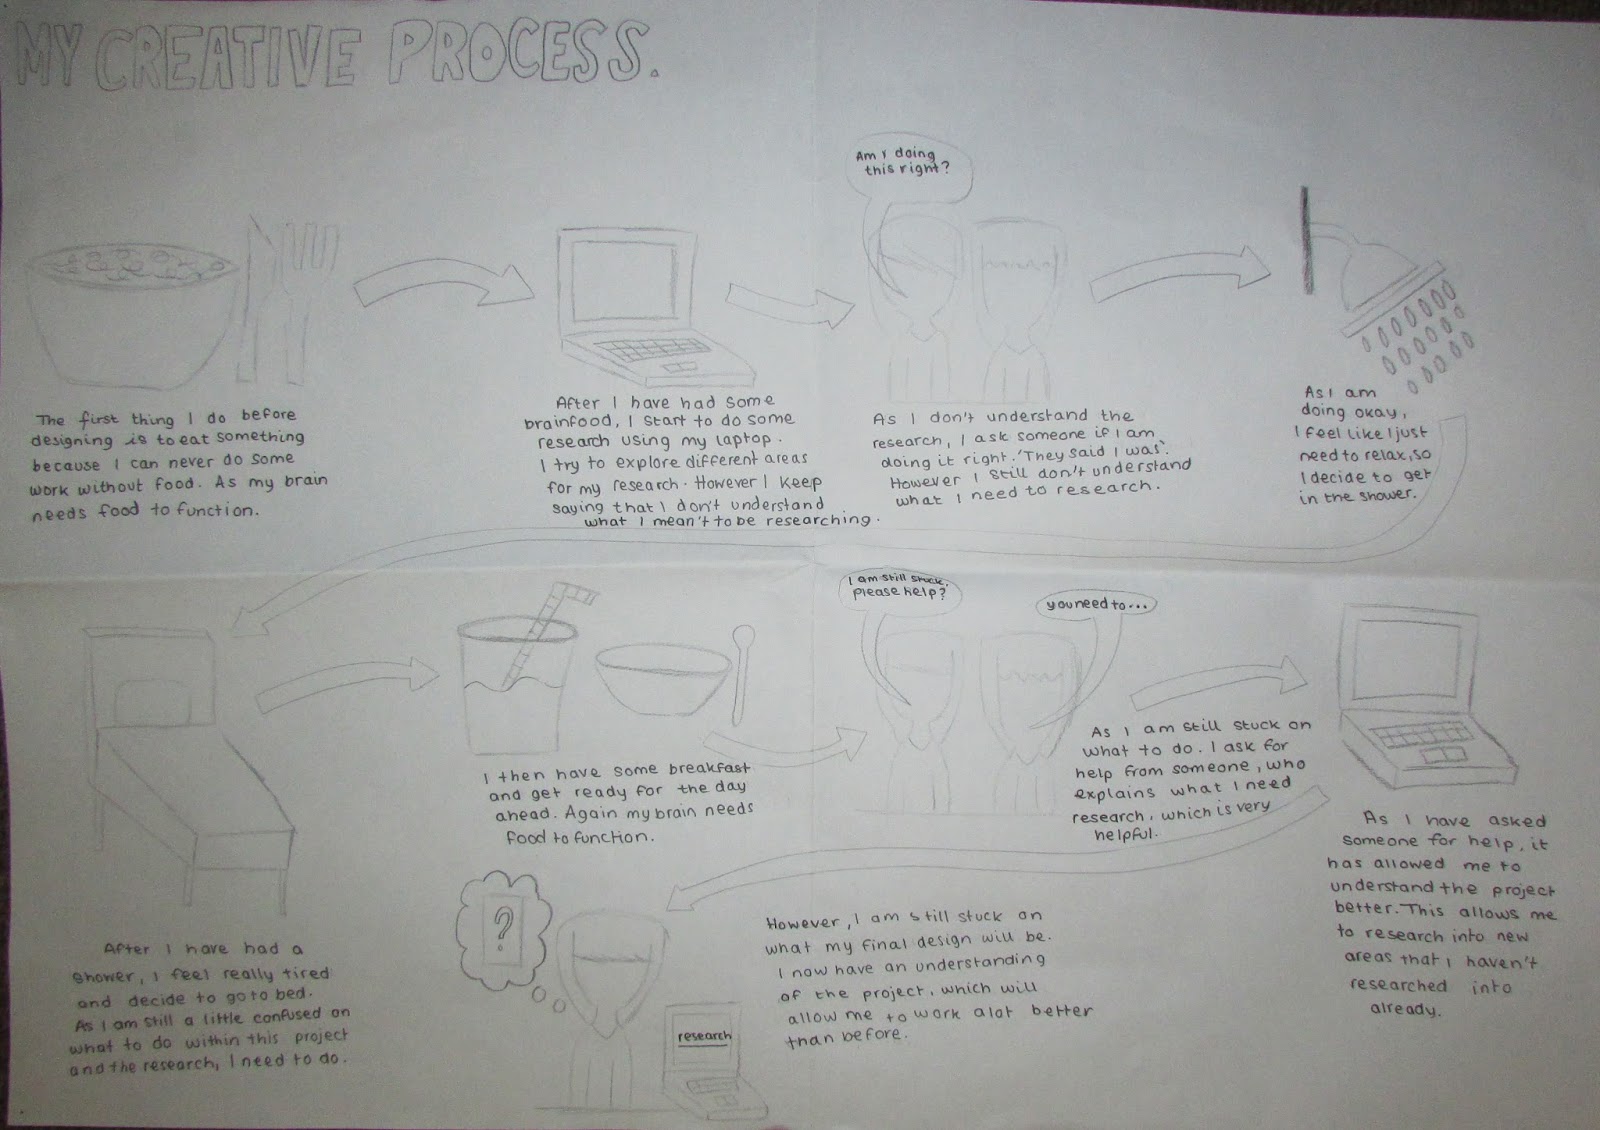
In this process and production lesson we were required to go into the centre of Huddersfield to produce some location drawings. Where we had to produce several drawing from the categories, Line Drawings that works with perspective drawing, we also had to look at People and Places, Type in Context, Skylines, Reflections and Architectural themes; i.e. doorknobs, Gargoyles, windows and etc. As I was in Group C1, my group went to the Market and Piazza, then the New Street Shopping Area near Primark and lastly the Gothic Quarter. We did Location Drawing to broaden our minds on what we could produce when drawing and looking at different Architectural drawings. Before we started drawing in different locations, we were given a wooden board, 2 sheets of A2 paper, 5 sheets of A5 Tracing Paper, a brown envelope that I could use for experimentation and lined paper that we could use for perspective drawing.


On the day of the drawings I wasn't best pleased with how my drawing turned out because I wasn't so happy with what I had drawn, as I am not fantastic at drawing. However, after a couple of days, I  started to like them a little more after I kept looking at my Illustrations in more detail. The part of this lesson that went well was the drawing that I produced at the Market and Piazza because i found that this drawing was one of my best overall, as my others didn't really look that good. I am happy with how this drawing was created, as I used five layers of tracing paper that I have built on top of each other. My bottom layer is a drawing of the Market and Piazza, then the other four layers that are on top are of people that walk by every couple of minutes.


I think that the other parts that could have gone better was the drawings that I produced in the Gothic Quarter because I feel that the drawings that I produced weren't brilliant, as I am not that brilliant at drawing. I think that these could have been better, if we had more time at the Gothic Quarter because I would have been able to take my time on the drawing to make them look professional and presentable. Another reason that I could do to improve my drawings would be to add more detail to the drawing to create a more creative drawing that people would be able to understand more easily.


I think that I would do something differently, if I had the chance to improve on my Location Drawing because I think that if I had more time to draw, I would maybe add a lot more detail to the drawings to make them stand out more. This would make them easier to understand what is being presented within the drawing. I think that the location drawing has helped me in many ways because it has allowed me to experiment with drawing and improve on my drawing skills to produce good outcomes. I have learnt many things from this that I should like my work whether it rubbish or good, location drawing has helped me to broaden my drawing skills in many ways. In the future, I feel that I am going to try do some location drawing when I visit different places to improve my drawing skills, that would allow me to get better at drawing.


This is one of my Location drawings that I drew, whilst I was in the Gothic Quarter. The building that I decided to draw whilst I was there was the Nando's building. I decided to draw this building because I liked the architectural style of drawing, as the building was very historic and featured a lot of historic buildings, that featured lots of historic features that were nice to draw. The material that I used for this drawing was Charcoal pencils. I did like using the Charcoal Pencils within this drawing, however in the futureI would like to experiment with different materials like Pens, Pencils, Marker Pens and Pastels. This would then allow me to see, which material would allow me to produce the best possible outcome for my Location drawing. I like this drawing that I have produced because I have tried to capture the structure and layout of the architectural building. My least favourite part about this design is that the drawing is very simple and basic, if I was to improve on this design I would try to draw this building more detail to create a professional and presentable looking drawing of Nando's.

Wednesday, 14 October 2015

Reflective Thinking and Writing

In this seminar, we learnt about Reflective thinking and writing. We were given the task to create a creative writing piece on something that has happened to us whilst being at University so far, focusing on the sketch book, blog and other work that we had started to create. In the first part of the seminar, we were given a description of what we thought reflection was.

What is Reflection?

Thoughts and Feelings, Analysing it, Reviewing it,
Development, Looking Back, Evaluating, Experience


After the definition of Reflection was explained, we were given a scenario of two interpretations of reflective writing, one that could be improved and the other that had already been improved. The scenario was if someone was late for an exam, we looked at the scenario and the points, which were wrong and could be improved in the future.

The Process of Reflection is:

                                                   Basic Observation/Describing situations
                                         Standing Back/Analysing from different perspectives
                                                                 Identifying Strengths
                                                      Identifying problems, weak areas
                                                             Considering alternatives
                                                        Action planning/Setting targets
                                                    Revisiting to evaluate improvements


Reference: Material adapted from King, T. (2002) Development of Student Skills in Reflective writing [online].

I chose to look at my sketchbook and my primary and secondary research and reflect on these pieces of work:

'As part of my project 'A Sense of Place', we had to do primary and secondary research. It was important part of the brief to make sure that I had maximum knowledge on the subject. I found this quite scary because I was a little confused about the brief that we had been set to begin with, as I wasn't entirely sure what route I wanted to take with this brief. I thought that my photograph of New York and mood boards went well, as my photography works well with the categories from the brief that I was given. the part that I could have done better on was my Primary research and mind maps, as I felt that this was something that I needed to work on. I have learnt many different things about this experience, which is that the research is harder than you think. I think that I could improve on this in the future by creating a timeline and plan of action, that I can use to help me do my Primary and Secondary research.' 


Monday, 12 October 2015

Seminar - Art Deco

In this seminar, we had to take a book from the library and use the website called summon. This site allows to look at books that are in the library, you can look up a book of any particular subject. For example I had to look at Graphic Design books that look into a particular Art movement. This site would also be able to tell you if the book is on loan or if its in the library and you can loan it for a couple of weeks. The book that I chose to take from the library was of an Art Movement called:

Art Deco

'Art Deco is a movement of design between 1920-1930. Art Deco is known as a Decorative Art, which is very similar to the movement known as Art Nouveau. However Art Deco is more of a contemporary style.  Art Deco was used for many things like book covers, jewellery, glass and many other things. Art Deco is very professional and prominent, as the alignment is very easy for the target audience to understand. The colours that are used in Art Deco are very dull and pale colours, which works very well with the typographic font that has been used for some of the book cover designs. There is a lot of repetition of bauhaus text, there is also a repetition of dull and pale colours. Some work that has been created in a Art Deco style is very simple and some work is very detailed.'

Rococo In France

I like this design, which uses Art Deco for their design work. The design, which I have chosen is known as Woman and Rococo in France that was written by Karl Torn. Within this design for the front cover of the book, there is several styles that have been used. Firstly the style that has been used is Art Deco, this was used for the woman and the pastel and pale background. Secondly the style that was used for the text was Bauhaus. 


The spacing of the design is very professional as the image that has been presented is very easy to see by the target audience, as the text has been placed in a prominent place that is easy to read. The spacing to the right of the image and text allow the design to look professional, as the design has been has a good layout. 

The colour of the design is very basic and range from black to white. I think that this colour scheme is good, as it doesn't allow the design to look overpowering to the target audience that the target audience is aiming towards. The Bauhaus typography that has been used is very suitable for the design and works really well with the style of the design because the typography is bold and does stand out well on the book cover, which allows the design to send a message to the target audience the book is aiming towards. 

The Image that has been presented on the book is very bold and easy to understand what is being shown in the Image. Also the Image related very well to the title of the book, as the Image that is shown on the design is of a woman and the title of the book is Woman and Rococo in France. This is inspiring, as I think it is very important for your design to relate well with each other. I am definitely going to take inspiration from this for my own design work.  

I think that this seminar went quite well, I was able to use the summon website to find a book that I wanted to take out of the library. It was quite easy to understand what the book was based on. I think that this seminar went really well because it allowed me to understand the art movement a lot better than I did, I was able to understand what era the movement Art Deco took place and what the movement was used for.

Thursday, 8 October 2015

InDesign Modernist Posters

JOSEF MÜLLER-BROCKMANN POSTERS

For this session, we learnt how to use Adobe InDesign, start from the basic tools, that we will need to use when creating a poster or another piece of design work that I will be going to working on. I was also given the task to create several posters using the basic tools that we had learnt in this session. The posters that we were given to design in the programme Adobe InDesign were by the designer known as Josef Müller-Brockmann, who is famous for the grid system in Graphic Design.

The tools, I used to create these Poster in the programme Adobe InDesign were the Rectangle tool, the Pen tool, Circle tool, the Gradient tool and the text tool. We had to create these posters to understand the basics of how to use the programme Adobe InDesign, even though I had used this programme before I did find this Process and Production very helpful because it was like a refresher.


I thought that this session was really good, as it refreshed a lot of the basics when using the programme. I thought that the programme was quite easy to use and I also learn't new tools that I could use when creating my work in Adobe InDesign. The part of this lesson that went well I think was creating the poster designs because I thought that when creating the posters I was able to put the basic tools that I had refreshed to good use. I thought that the posters that I have created looked like the posters that was created by Josef Müller-Brockmann. 


I have learnt new skills and refreshed on the basic tools that I already knew, which will allow me to apply this to my future project work, when using the programme Adobe InDesign. I will then be able to create the best possible outcomes for my project, which will attract people to look at. I think that in the future I am going to take inspiration from Josef Müller-Brockmann's Posters to create my own designs, I am going to also try to make my own Poster using Josef Müller-Brockmann's artwork style.


Wednesday, 7 October 2015

Approaches to research

Research.

In this seminar we learnt about research and why research is very important to us as designers. We did this because for our sense of place project we have to do Secondary and Primary research, to get the best outcomes for my sketchbook.

What is Research?

Research is a way of looking, a close enquiry.

Why should we research?

We should research to find:

Original Ideas
Context
Knowledge
Roots
Expansion

After this we were asked to work in pairs and each choose an object of are choice, but we had to keep it a secret. We then had to write down 10 questions to ask each other to try and work out, what object they had chosen. Like the game 20 questions, however we had to write them down first instead of thinking of the questions on the spot. The questions that I decided to ask were quite simple, but quite hard too as they were: 

1. Is it a living being?
2. Can you get it in different colours?
3. Does it come in different sizes?
4. Can you buy it from the shop?
5. Does it move?
6. Can you touch it?
7. Is it in the room?
8. Does it live outside?
9. Does it grow?
10. Do you have to water it?

After I had asked the 10 questions I thought that the object could either be a tree or a flower, so I decided to go with a flower. Unfortunately it was a tree, but I was quite happy that it was one of my two choices of answers that I had thought of. When it was my turn the answers that my partner had chosen were also very simple and did fit well with the chosen object, which I had chosen as I had chosen a Tiger. My partner guessed this object the first time around. I found that in the future I needed to make sure that the object that I had chosen was quite harder and not too obvious. This is because my object was quite an easy object to guess. However I did think that this task was quite fun and very productive. 

Once we had done the 10 questions with our partner we then looked at Parallax, which is a subject stays the same, but appears to be different when the Image has an altered perspective. Once we had done this we then looked at research pointers to help us understand what we need to do to help us research. 

Research pointers that we given were: 

  • Research is a fluid process, which means that the research we produce should flow in an understandable way.
  • Major problems that are created don't have be solved, as we could look at the problem in totally different way that might help us to research into other areas. 
  • It is a close enquiry, this means that you should look around the place that you live and talk to different people as this will allow you to create new research ideas. 
  • Look at the response that you get from different people, as this will given you lots of inspiration to look into different areas that you can research. 
  • Finally look into creating a timeline or plan that will help to guide you through your research and the area that you need to cover. This will also help with your time management skills. 

After we had look at research pointers we the did the 20 questions again, however this time we had to have the questions prepared to ask, as we wasn't allowed to write them down before we had asked our partner the question. This time I decided to choose a Cactus, as my first object that I had chosen before was quite easy. I thought that these way was a lot easier than before because you could think on the spot and didn't have to have the question pre written, which I found a lot harder. 

Even though I thought this way was a lot easier it was still hard to guess my partners object, as the questions that I asked were: 

1. Is it Living?                                                                11. Does it use light?
2. Is it Food?                                                                  12. Can you carry it? 
3. Is it in this room?                                                       13. Does it get warm?
4. Can you get it in different colours?                           14. Is it a vent?
5. Can you get it in different sizes?                               15. Is it a machine?
6. Do we use it?                                                             16. Do people use it?
7. Does it use power?                                                    17. Do you have to use a plug socket for it to 
8. Is it a Laptop?                                                                  work?
9. Can we talk through it?                                             18. Does it have a screen? 
10. Is it a Mobile Phone?                                              19. Does it have a Keyboard?
                                                                                      20. Is it a Computer?

The answer to my partner's object was a computer.

I found that this seminar was very useful because it was a lot easier to play the game of 20 questions when you had think of the question on the spot, which I am going to take inspiration from for my research, as I will be able to look at areas that just appear in my head and will somehow fit within my project. I will also be able to looking into experimentation and look at research differently to find new ways to research new ideas for my Primary and Secondary research within the project 'A Sense of Place'.

Monday, 5 October 2015

Creative Process

In this seminar, we were given the task of creating a creative process, that we used when I started to look for my Secondary and Primary Research for my sketchbook. I think that this process helped me to understand how I was finding it, whether it was hard or easy. I was able to show how my research was at the beginning to how my research is going at the moment. This task was ok, however I struggled at first to work out, what I need to produce, however after I spoke to my peers my idea of my creative process became clearer. I thought that the part, which went well on the Creative Process was the layout of the design because I thought that this allowed me to understand the process that I have been going through so far, as it was well set out.


I think that I could have improved on this design by adding colour to the Creative Process to create an eye catching piece, this would then allow me to capture peoples attention when showing others. Another part that could have gone better in my Creative Process is the Illustrations that I have drawn on the creative process because I am not pleased with how these Illustrations turned out. This is because they could have been larger, more detailed and coloured in bright and vibrant colours, which would then capture the attention of the target audience. My future actions that I will do to improve this Creative Process is to expand on my the design, as I am researching into Secondary and Primary Research. 

How to have an idea

How to have an Idea.

In the first part of the Lecture, we talked about how as an individual have been asked in the Studio to commence several different aims to complete our project. However, we had to think about were aims come from.

‘Aims / To communicate ideas through images, words, layout, sequence… / To engage in weekly, sustained research to build up a folder of visual and text-based references on defined theme / To make a record of ideas and responses / To show evidence of contextual and theoretical awareness / To identify an approach / enquiry in relation to the topic / To develop, test, and resolve solution(s) that meet the brief / Reflect…’

Evaluating your project allows us to look at possible to solutions to help you correct your work, to allow you to get the best possible outcome. Evaluation means:

‘It is an idea that can grow with your interest’

Creativity is

‘The generation, development and transformation of ideas that are both novel and useful for solving problems’

This means that old ideas can be created into new idea, creativity is created by solving problems. A quote that allows to understand how creativity is so important is from the handbook of Creativity by Thomas B Ward:

‘the capacity for creative thought is the rule rather than the exception in human cognitive functioning…’


After this we looked how we could tackle being stuck and how we can create different ideas that will help us in our project.

Four Method Process - 

Preparation – This is looked at carefully considered, as the resources that you need to gather will help you to complete your task or project.

Incubation – Looking at ideas, to help with the consideration of the problem you need to overcome and face.

Illumination – Theses are the possible solutions that can be used to solve the problem you are going to looking at.

Verification – The solutions that you come up with need to be tested, after this you can use them to work with if they’re working.


When looking into our Secondary and Primary research for our sketch book we have to consider:

‘Where can you find ideas? / Have you got an entry point into your topic? / Something that intrigues you and can start a direction or train of thought, a discussion, an argument, an investigation; this could be a theory, an image, a scene from a film or novel, chapters titles in books, a quote…) / Is there a problem or issue that needs to be identified first’

Once we had look at how to find ideas, we had to think about what we could produce to solve our problems from where we could find ideas, the outcomes were:

Attributes List
Mindmaps
Synetics
Moodboards
Brainstorming
Brain Writing
Prototypes

I found that this Lecture was very helpful, as it allowed me to explore into different areas that I wouldn't normally look in to find an idea that will allow me to produce different areas of research.